
This tutorial for how to make these Nightmare Before Christmas inspired Oogie Boogie DIY Mouse Ears will have you dreaming of Halloween at Disneyland.

Nightmare Before Christmas is one of my favorite movies. So it stands to reason that I love the boogie man also known as Oogie Boogie.
I wanted to dress both of my babies up as Oogie Boogie for Halloween their first year. I didn’t. But I wanted to.
So I thought since we were going to Disney World for Halloween that I would make some special Oogie Boogie Mouse ears.
If you are also planning a trip to Disney be sure to check out Get Away Today for the best prices around.

The tutorial below outlines how I made mine so that you can make some of your own.
Supplies
Cricut Maker
Cricut Fabric Mat
Cricut Rotary blade
Cricut Standard Mat
Cricut Fine Point Blade
Cricut Tools
Cricut EasyPress2
Cricut EasyPress Mat
Headband
Green cotton fabric
Green burlap
Foam sheets
Glitter faux leather (SO MANY COLORS!)
Velvet ribbon
Polyfil
Cricut Black Iron-on
Faux bugs
Scissors (I love these ones!)
Double stick tape
Hot glue
Hot glue gun
Sewing machine
Oogie Boogie Mouse Ears Cut File
Oogie Boogie Stitching Cut File
How to make mouse ears
First I cut out the green cotton fabric, the light green template. Smooth out your fabric nice and wrinkle-free on the pink Cricut fabric mat.
Put the rotary blade in the Cricut Maker, select the cotton fabric setting and press the Cricut button to start the cut.
Both the green templates are the same size so it doesn’t matter which one you actually do.
Carefully remove the cotton fabric from the mat with tongs or the spatula.
Then I did a second cut with green burlap. Press the material firmly to the mat, select the burlap cut setting and start cutting.
Next, I cut all the ear stabilizers (the white template) out of the white foam sheeting. I used white, but you can use whatever color you choose
Then I cut the glitter faux leather for the bow, the gray template.
Lastly, I cut the stitches out of black iron-on using a standard mat and the fine point blade.
Mirroring iron-on is a great habit to be in but it doesn’t matter if you forget this time.
Now it’s time to sew.
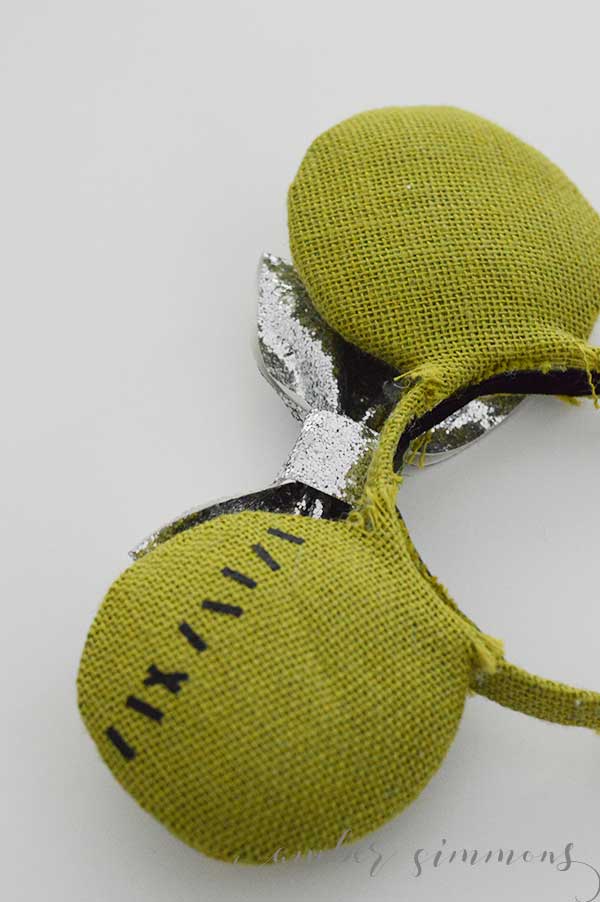
Sandwich your ears like this:
Cotton, right side up
Burlap
Burlap
Cotton, right side down
Starting at the bottom, where the squared piece comes off the circle, sew around the edge of the circle. Don’t go down the straight sides. Just around the circle.
Leave the squared area open for turning. Repeat for the second ear.
Turn the ears right side out between the burlap layers so that there is burlap on the front and back of the ear.
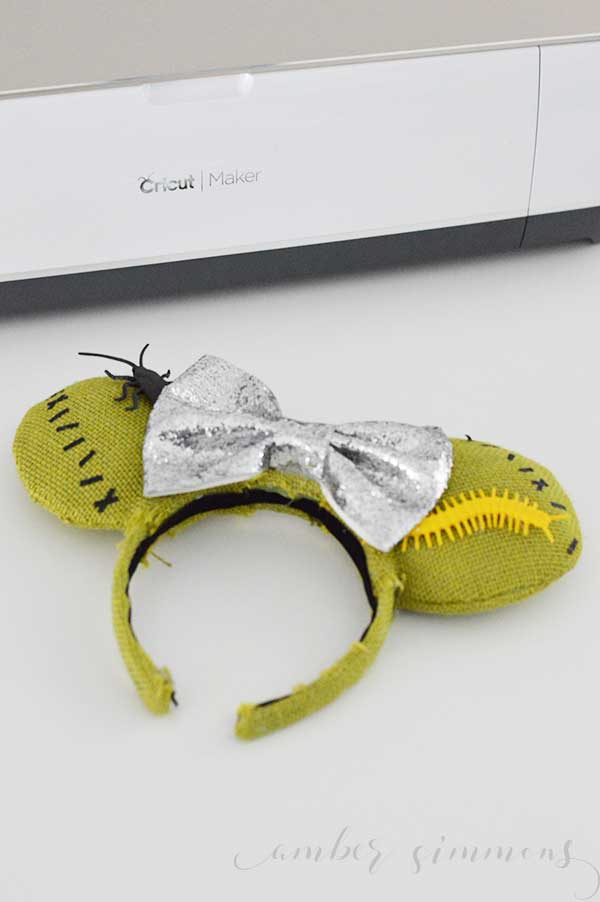
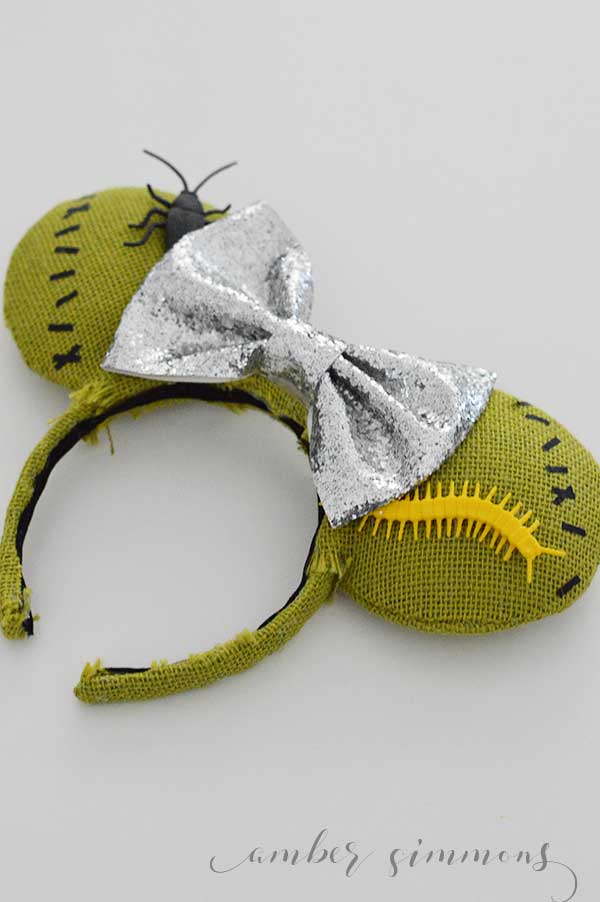
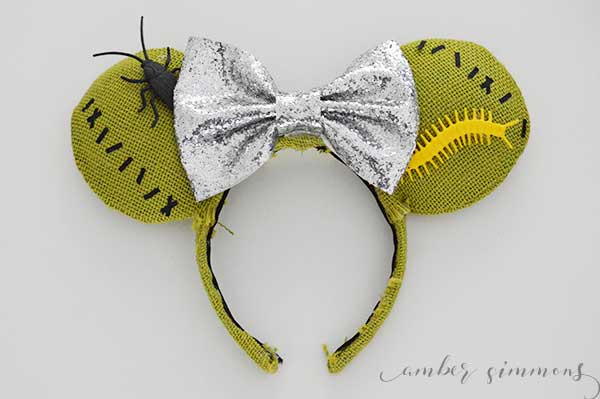
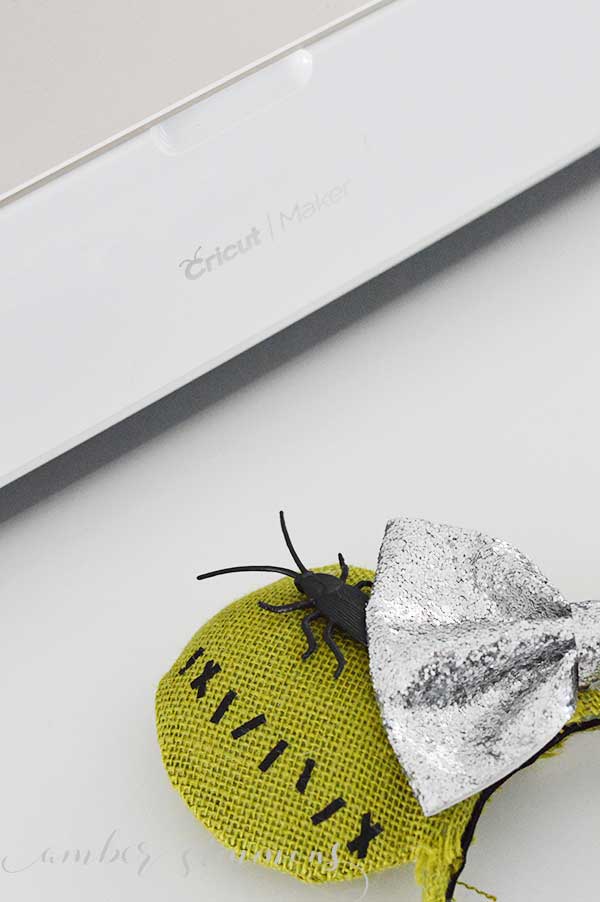
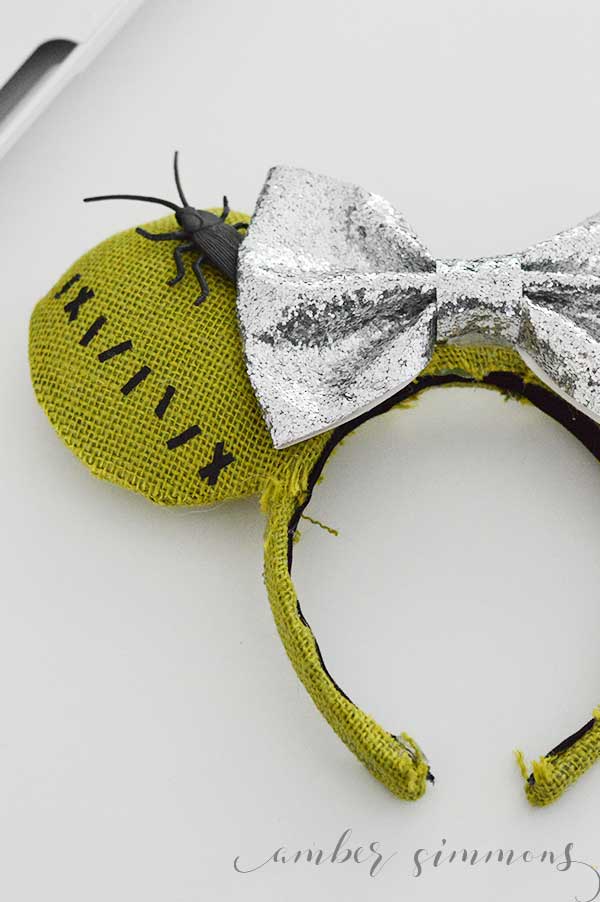
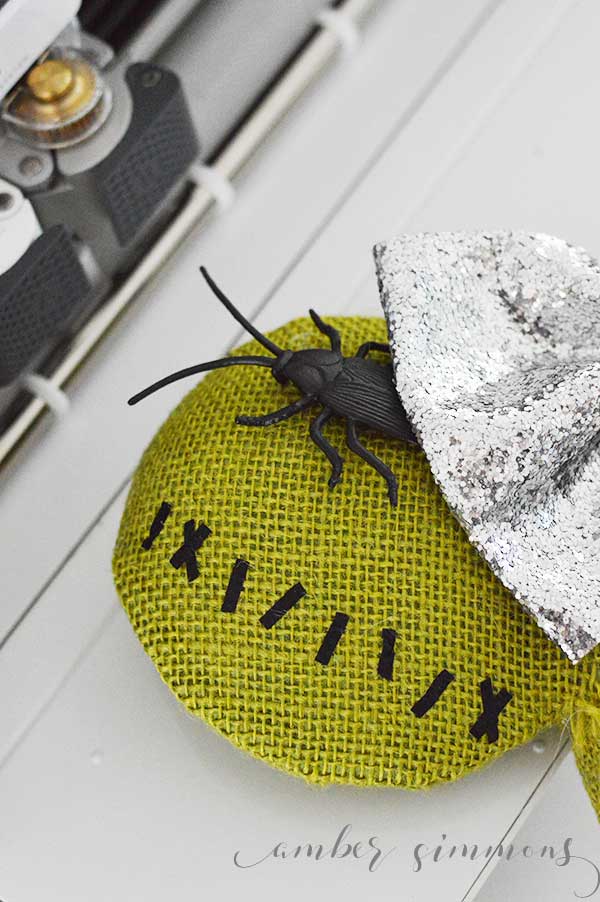
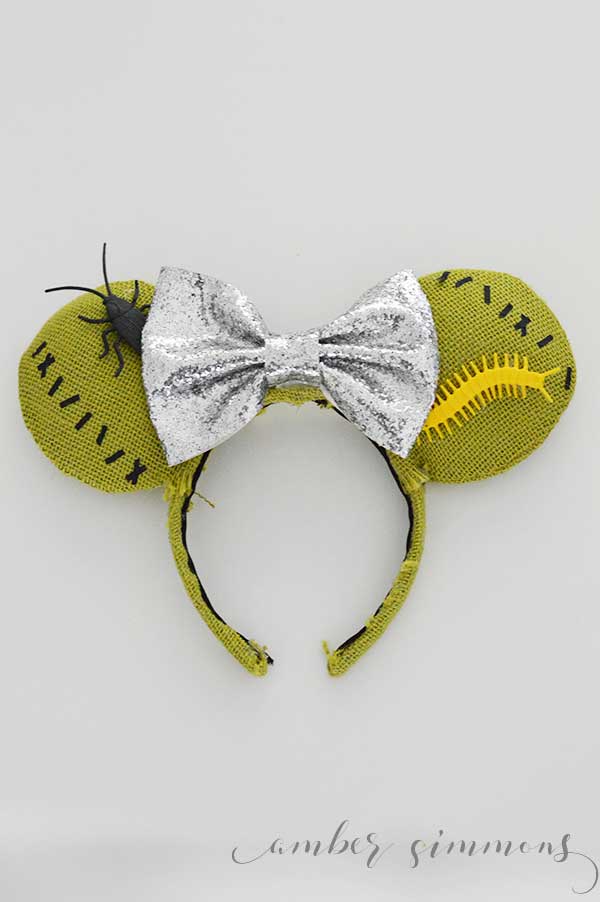
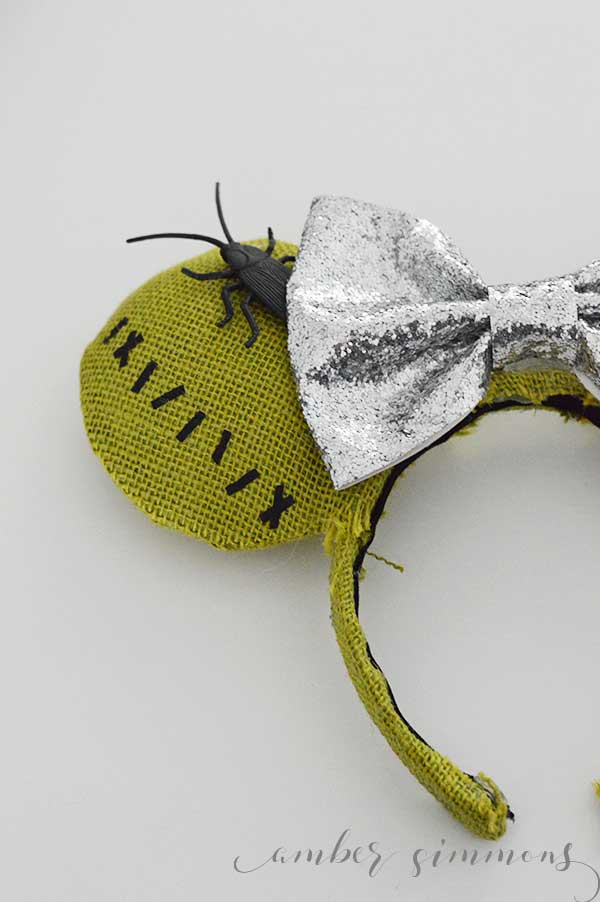
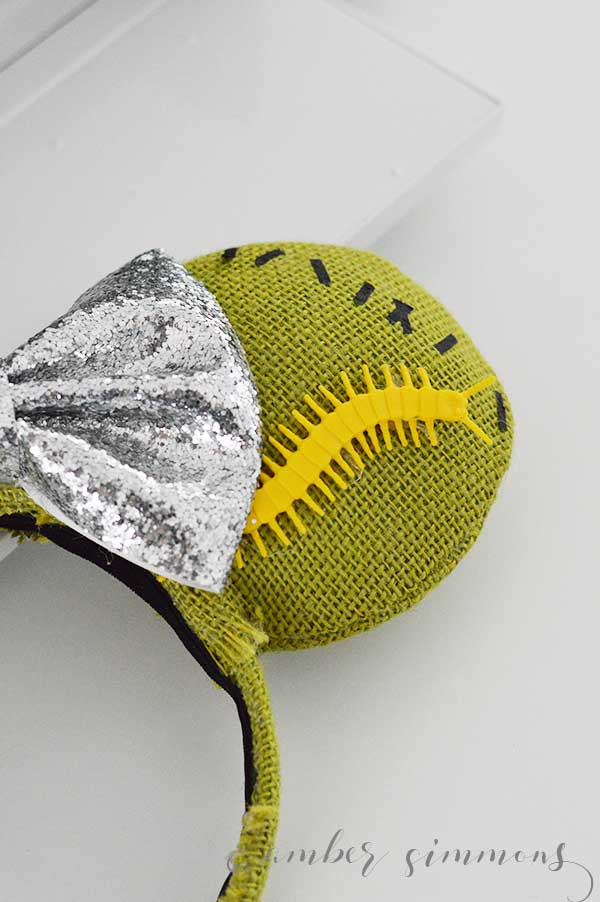
Now it is time for the iron-on stitches. I just decided how I wanted to angle them on the ears and trimmed the iron-on down accordingly. Think about the front as well as the back.
Follow the Cricut heat guide to find the right EasyPress2 setting for the material. The recommendation for Cricut Everyday Iron-on with the EasyPress2 and the EasyPress Mat is 305 degrees for 30 seconds.
Press the iron-on stitches to the ears and remove the transfer material.
Now, this part gets a little tricky since you are working in such a small area, stuff three of the foam pieces in each ear. The curved edge is down so that it will sit against the headband.
Once you have the foam in the ears, take a little bit of polyfill and stuff it in the ears between the foam and the fabric. This will fill the ears in a bit to make them look less flat.
Be sure to do this on the front and the back of the ears. You can fill them as much or as little as you would like.
How to make a large bow
Now it’s time to plug in the hot glue gun.
Take large glitter faux leather piece, place it facedown on the table so that it is long. Find the center (the 6-inch mark) and place a 4-inch piece of double-sided tape. You can also use hot glue.
Fold the ends in to meet in the middle. Press them down to the double-stick tape. Don’t crease the folds, we want a nice full edge to the bow.
Pick it up and turn it over so you are looking at the front. Pinch the very center so that it folds backward. You are creating the center pinch of the bow.
You want it to fold backward about 3/4 inch, then fold forward 3/4 inch, and then back again on either side the center.
Those are not exact measurements. I am just trying to give you an idea of how to pinch it all together. Be sure the top and bottom of the bow are at the back of the bow.
Add some hot glue between the folds to hold it together. You can glue the front and back if you would like.
Take the other glitter piece and glue the end to the back of the bow. Wrap it around the front, gluing as you go, and glue it down when you get back to the back.
Cut off any excess material.
How to cover a headband
Using scissors, cut a piece from each of the fabric scraps, the cotton and the burlap the size of your headband.
If you have a measuring tape you can measure how much you need. Otherwise, you can use your headband to measure by rolling it from one end to the other.
You also want the strip to be about a 1/2 wider than the headband. You are going to fold about 1/4 under the headband on either side.
Using the hot glue gun, glue the cotton fabric to the top of the headband. Flip the headband over and carefully fold in and glue the edges.
Glue the burlap strip on top of the green cotton on the outside of the headband. Turn it upside down and glue the edges down again.
How to assemble your DIY Mouse Ears
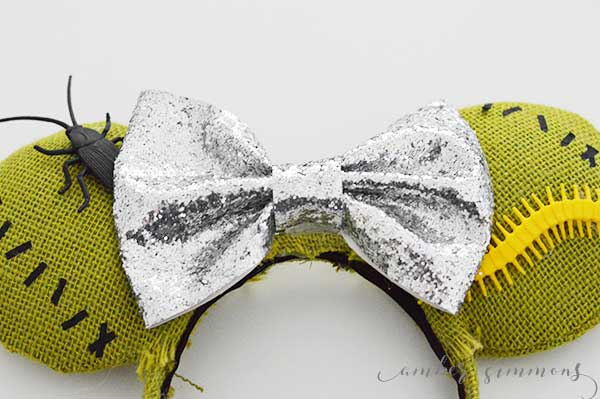
Now, take your ears and decide where to place them. I had a pair of ears from Disney so I used that as my guide.
Take the bottom squared edge of the ear and wrap it around the headband. Glue it into place.
Repeat for the other ear.
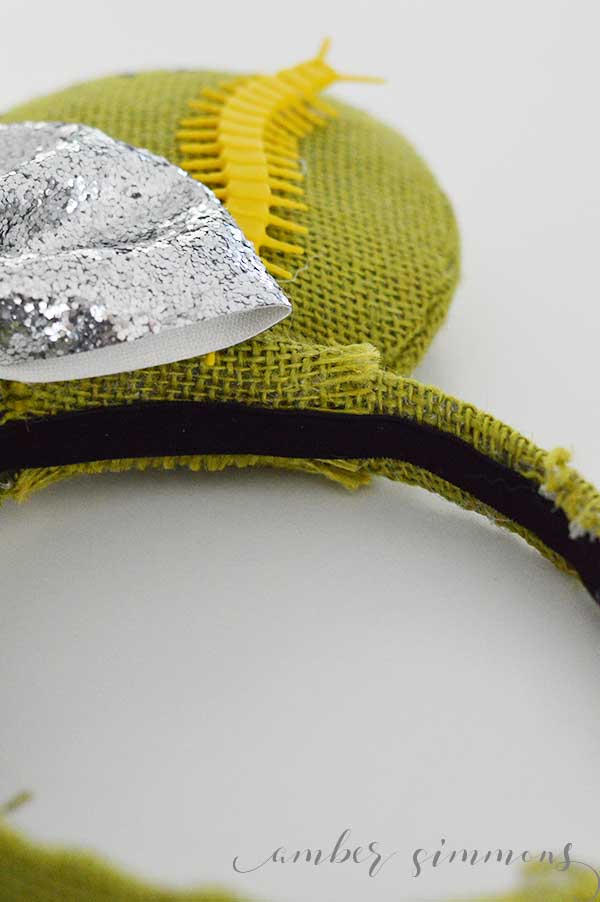
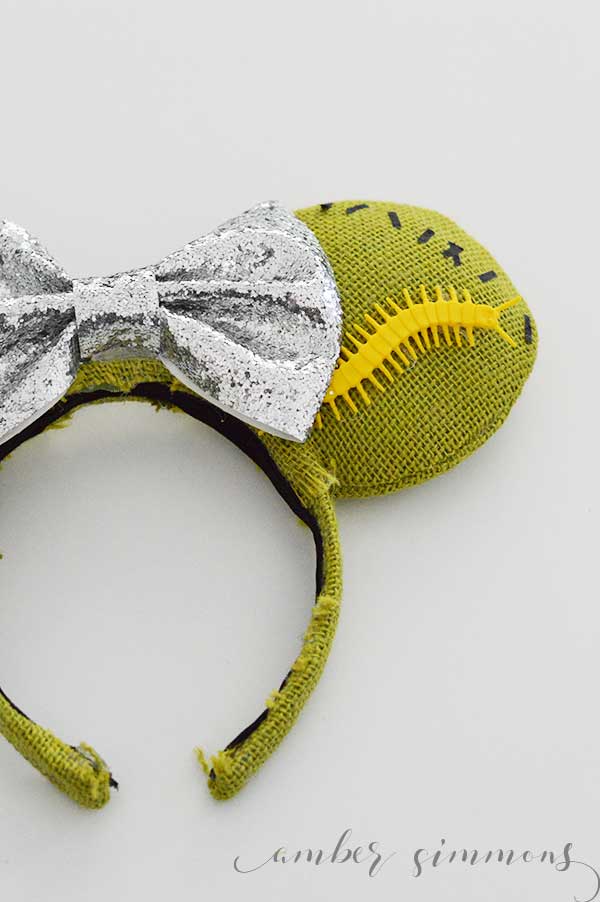
Hot glut the bow into place between the ears. I glued it down in the center to start where it touched the headband between the ears.
Now cut a piece of velvet ribbon the length of your headband. Glue it underneath to hide all the raw edges of fabric from covering the headband.
For the finishing touch glue some bugs to the ears. I had mine coming out from behind the bow.
And that’s it!
I LOVE how they turned out.
Have you made Mouse Ears before?
Comment below to show some Oogie Boogie love.

[…] Stop at the Mad Hatter’s and get some Mouse Ears. […]