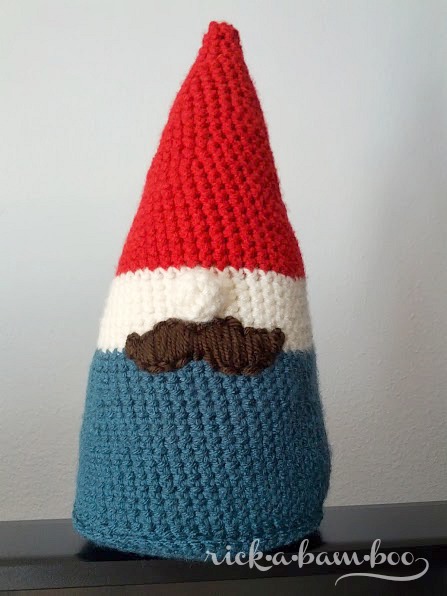
This cute crochet gnome will add a touch of whimsy to your home and put a smile on your face whenever you look at him. Plus, the pattern is free!

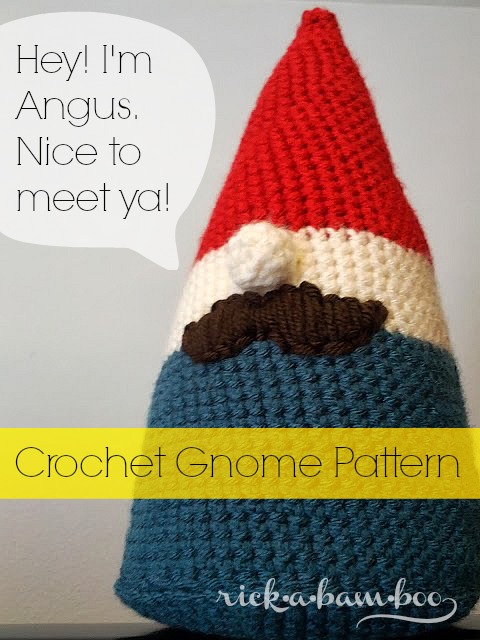
Hello Angus! Aren’t you just a cutie? I love your nose and mustache.
I came across the most adorable gnome on Pinterest and I just had to have one for myself.
Check him out. He is just full of adorableness.
She used a pattern from another Danish blog. Once upon a time, I Google translated the pattern since it was not available in English.
However, Google translator isn’t the best when it comes to translating things like crochet terms, so even after I translated it there was still a lot of deciphering to be done.
Originally posted in August 2013. Updated August 2019.
Now that I’m ready to make this gnome I can no longer find the post with the pattern in it, so I made my own based on what I remember and my own crochet knowledge.
If you make up your own gnome, I’d love to see it! Let’s hook up on Instagram.
Get it? Hook up? Crochet? Okay, I’ll stop.
But seriously, if you make it and share it I would love for you to tag me.
If you are in need of a printable pattern there is one at the end of this post.
Supplies
Yarn for the hat
Yarn for face/nose
Yarn for the body
Yarn for the mustache (optional)
G / 4mm hook
Yarn needle
Fabric scrap (optional)
Pattern Notes
sc – single crochet
( ) – round stitch count
Cute Crochet Gnome Softie Free Pattern
Hat
Round 1: 6 sc into a magic ring (6)
Round 2: sc in all stitches (6)
Round 3: sc into the first stitch, 2 sc into the next stitch, repeat around. (9)
Round 4: sc in all stitches (9)
Round 5: sc into the first two stitches, 2 sc into the next stitch, repeat around. (12)
Round 6: sc in all stitches (12)
Round 7: sc into the first three stitches, 2 sc into the next stitch, repeat around. (15)
Round 8: sc in all stitches (15)
Round 9: sc into the first four stitches, 2 sc into the next stitch, repeat around. (18)
Round 10: sc in all stitches (18)
Round 11: sc into the first five stitches, 2 sc into the next stitch, repeat around. (21)
Round 12: sc in all stitches (21)
Round 13: sc into the first six stitches, 2 sc into the next stitch, repeat around. (24)
Round 14: sc in all stitches (24)
Round 15: sc into the first seven stitches, 2 sc into the next stitch, repeat around. (27)
Round 16: sc in all stitches (27)
Round 17: sc into the first eight stitches, 2 sc into the next stitch, repeat around. (30)
Round 18: sc in all stitches (30)
Round 19: sc into the first nine stitches, 2 sc into the next stitch, repeat around. (33)
Round 20: sc in all stitches (33)
Round 21: sc into the first ten stitches, 2 sc into the next stitch, repeat around. (36)
Round 22: sc in all stitches (36)
Round 23: sc into the first eleven stitches, 2 sc into the next stitch, repeat around. (39)
Round 24: sc in all stitches (39)
Round 25: sc into the first twelve stitches, 2 sc into the next stitch, repeat around. (42)
Round 26: sc in all stitches (42)
Round 27: sc into the first thirteen stitches, 2 sc into the next stitch, repeat around. (45)
Round 28: sc in all stitches (45)
Face
Change the yarn to the face color
Round 29: sc into the first fourteen stitches, 2 sc into the next stitch, repeat around. (48)
Round 30: sc in all stitches (48)
Round 31: sc in all stitches (48)
Round 32: sc into the first fifteen stitches, 2 sc into the next stitch, repeat around. (51)
Round 33: sc in all stitches (51)
Round 34: sc in all stitches (51)
Round 35: sc in all stitches (51)
Body
Change yarn to body color.
Round 36: sc into the first sixteen stitches, 2 sc into the next stitch, repeat around. (54)
Round 37: sc in all stitches (54)
Round 38: sc in all stitches (54)
Round 39: sc in all stitches (54)
Round 40: sc into the first seventeen stitches, 2 sc into the next stitch, repeat around. (57)
Round 41: sc in all stitches (57)
Round 42: sc in all stitches (57)
Round 43: sc in all stitches (57)
Round 44: sc into the first eighteen stitches, 2 sc into the next stitch, repeat around. (60)
Round 45: sc in all stitches (60)
Round 46: sc in all stitches (60)
Round 47: sc in all stitches (60)
Round 48: sc into the first nineteen stitches, 2 sc into the next stitch, repeat around. (63)
Round 49: sc in all stitches (63)
Round 50: sc in all stitches (63)
Round 51: sc in all stitches (63)
Round 52: sc into the first twenty stitches, 2 sc into the next stitch, repeat around. (66)
Round 53: sc in all stitches (66)
Round 54: sc in all stitches (66)
Round 55: sc in all stitches (66)
Fasten off and weave in ends.
Nose
Using the face color
Round 1: 4 sc into a magic ring (4)
Round 2: 2 sc in all stitches (8)
Round 3: sc in all stitches (8)
Round 4: sc in all stitches (8)
Fasten off with a long tail. Use tail to stitch nose to the face.
Bottom
Using the body color yarn
Round 1: 6 sc into a magic ring (6)
Round 2: 2 sc into each stitch (12)
Round 3: sc into the first stitch, 2 sc into the next stitch, repeat around. (18)
Round 4: sc into the first two stitches, 2 sc into the next stitch, repeat around. (24)
Round 5: sc into the first three stitches, 2 sc into the next stitch, repeat around. (30)
Round 6: sc into the first four stitches, 2 sc into the next stitch, repeat around. (36)
Round 7: sc into the first five stitches, 2 sc into the next stitch, repeat around. (42)
Round 8: sc into the first six stitches, 2 sc into the next stitch, repeat around. (48)
Round 9: sc into the first seven stitches, 2 sc into the next stitch, repeat around. (54)
Round 10: sc into the first eight stitches, 2 sc into the next stitch, repeat around. (60)
Round 11: sc into the first nine stitches, 2 sc into the next stitch, repeat around. (66)
Fasten off with a long tail. Use tail to stitch the bottom to the body.
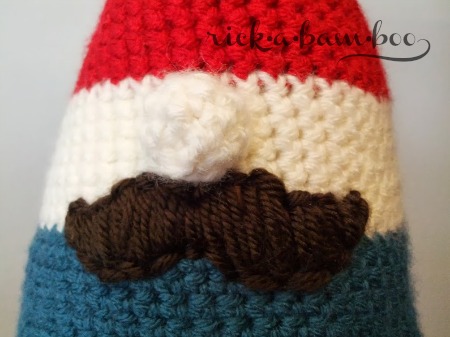
I completed the main part of the gnome (the hat, face, and body) and stitched my mustache on before stitching on the nose or bottom.
For the mustache, I cut one out of some brown fabric that I had and tacked it on to my gnome where I wanted to stitch on the mustache so that I had a shape to follow to try to make it as even as possible when I stitched it on.
Then I just stitched over the fabric, so there’s a fabric mustache hidden in there somewhere.
After I had stitched over the fabric mustache, I backstitched around it to make my edges cleaner.
Once I had the mustache on I stitched the nose on, stuffed my gnome and stitched the bottom on. Done!
There really is no gauge for this project.
The finished size will depend on how tight your stitches are and the type of yarn you use.
I used Hobby Lobby’s I Love This Yarn acrylic (my favorite) in red, ivory, antique teal, and coffee.
Angus ended up being about 11 inches tall and 5.5 inches wide. I love him and I think you will too.
If you make one I’d love to see it. Share it via social media with the hashtag #ambersimmonsblog.
Cute Crochet Gnome Softie Free Pattern
Instructions
Hat
Round 1: 6 sc into a magic ring (6)
Round 2: sc in all stitches (6)
Round 3: sc into the first stitch, 2 sc into the next stitch, repeat around. (9)
Round 4: sc in all stitches (9)|
Round 5: sc into the first two stitches, 2 sc into the next stitch, repeat around. (12)
Round 6: sc in all stitches (12)
Round 7: sc into the first three stitches, 2 sc into the next stitch, repeat around. (15)
Round 8: sc in all stitches (15)
Round 9: sc into the first four stitches, 2 sc into the next stitch, repeat around. (18)
Round 10: sc in all stitches (18)
Round 11: sc into the first five stitches, 2 sc into the next stitch, repeat around. (21)
Round 12: sc in all stitches (21)
Round 13: sc into the first six stitches, 2 sc into the next stitch, repeat around. (24)
Round 14: sc in all stitches (24)
Round 15: sc into the first seven stitches, 2 sc into the next stitch, repeat around. (27)
Round 16: sc in all stitches (27)
Round 17: sc into the first eight stitches, 2 sc into the next stitch, repeat around. (30)
Round 18: sc in all stitches (30)
Round 19: sc into the first nine stitches, 2 sc into the next stitch, repeat around. (33)
Round 20: sc in all stitches (33)
Round 21: sc into the first ten stitches, 2 sc into the next stitch, repeat around. (36)
Round 22: sc in all stitches (36)
Round 23: sc into the first eleven stitches, 2 sc into the next stitch, repeat around. (39)
Round 24: sc in all stitches (39)
Round 25: sc into the first twelve stitches, 2 sc into the next stitch, repeat around. (42)
Round 26: sc in all stitches (42)
Round 27: sc into the first thirteen stitches, 2 sc into the next stitch, repeat around. (45)
Round 28: sc in all stitches (45)
Face
(Change to face color)
Round 29: sc into the first fourteen stitches, 2 sc into the next stitch, repeat around. (48)
Round 30: sc in all stitches (48)
Round 31: sc in all stitches (48)
Round 32: sc into the first fifteen stitches, 2 sc into the next stitch, repeat around. (51)
Round 33: sc in all stitches (51)
Round 34: sc in all stitches (51)
Round 35: sc in all stitches (51)
Body
(Change to body color)
Round 36: sc into the first sixteen stitches, 2 sc into the next stitch, repeat around. (54)
Round 37: sc in all stitches (54)
Round 38: sc in all stitches (54)
Round 39: sc in all stitches (54)
Round 40: sc into the first seventeen stitches, 2 sc into the next stitch, repeat around. (57)
Round 41: sc in all stitches (57)
Round 42: sc in all stitches (57)
Round 43: sc in all stitches (57)
Round 44: sc into the first eighteen stitches, 2 sc into the next stitch, repeat around. (60)
Round 45: sc in all stitches (60)
Round 46: sc in all stitches (60)
Round 47: sc in all stitches (60)
Round 48: sc into the first nineteen stitches, 2 sc into the next stitch, repeat around. (63)
Round 49: sc in all stitches (63)
Round 50: sc in all stitches (63)
Round 51: sc in all stitches (63)
Round 52: sc into the first twenty stitches, 2 sc into the next stitch, repeat around. (66)
Round 53: sc in all stitches (66)
Round 54: sc in all stitches (66)
Round 55: sc in all stitches (66)
Fasten off and weave in ends.
Nose
(Face color)
Round 1: 4 sc into a magic ring (4)
Round 2: 2 sc in all stitches (8)
Round 3: sc in all stitches (8)
Round 4: sc in all stitches (8)
Fasten off with a long tail. Use tail to stitch nose to the face.
Bottom
(Body color)
Round 1: 6 sc into a magic ring (6)
Round 2: 2 sc into each stitch (12)
Round 3: sc into the first stitch, 2 sc into the next stitch, repeat around. (18)
Round 4: sc into the first two stitches, 2 sc into the next stitch, repeat around. (24)
Round 5: sc into the first three stitches, 2 sc into the next stitch, repeat around. (30)
Round 6: sc into the first four stitches, 2 sc into the next stitch, repeat around. (36)
Round 7: sc into the first five stitches, 2 sc into the next stitch, repeat around. (42)
Round 8: sc into the first six stitches, 2 sc into the next stitch, repeat around. (48)
Round 9: sc into the first seven stitches, 2 sc into the next stitch, repeat around. (54)
Round 10: sc into the first eight stitches, 2 sc into the next stitch, repeat around. (60)
Round 11: sc into the first nine stitches, 2 sc into the next stitch, repeat around. (66)
Fasten off with a long tail. Use tail to stitch the bottom to the body.
New to crochet? Check out my Learn to Crochet series!







I love him! Thanks for sharing the pattern . . . . I might need some gnome friends of my own. 😀
SO cute! Teach me to crochet!
That is so cute!!! I wish I knew how to crochet 🙂
This is so cute! I am learning to crochet, so this project may just work for me. I will send you a picture when I get it done! Deb@ Kneaded Creations
This is So super cute, makes me want to learn how to crochet!
Pinned!
(From OBC)
Thanks so much for sharing! I’m on a very limited budget and free always will fit into it! Bless you!
I’m so glad you figured out this pattern for me! I’m always frustrated when I find cute pictures on pinterest only to find that the actual pattern isn’t available. Not that this is super complex, but you definitely did the hard part for me and I appreciate it. I did tweak your pattern a little though because I didn’t see a need for making a separate piece to sew on the bottom. Granted it probably makes stuffing easier, but I decided to start with the bottom and work my way up. After round 11 of the bottom, I went straight to round 55 of the body working in back loops only to make it turn. I think it worked out pretty well! I also added a circle of thin cardboard inside before stuffing it, just in case it needed help standing. I’m not sure it did though. Now I’m thinking about altering the pattern a little to make different sizes. Thanks for sharing Angus with us! (Love the name too! hehe). Oh, I was also thinking (since it’s almost December) that this could easily be a Santa thing. Not that we need more santas, but black bottom, red hat, maybe a gold buckle instead of the mustache. I like the abstract representation.
The bottom up is definitely another great way to do it! That didn’t even occur to me. I think he would make a great Santa and make a few smaller elves to go with him. Love it!
This is a great little, easy pattern to do and once you have the one size you could have all different kinds of sizes
Hi. Very cute gnome. I have a blog in french and I will be very happy to propose this pattern. Could I translate it in french and publish it on my blog?
Thanks for sharing! I love gnomes! When you crocheted the rounds did you slip stitch into the beginning of each round?
No I did not. I just kept going around to make it as seamless as possible.
How die you make The nose?
The pattern for the nose is listed in the post. Right below the body pattern.
Thank you for the pattern. I fell in love with last year and finally made him. I called mine Argyle!
He’s adorable! Looks like Mario and Luigi’s grandpa. I’ll be making him and some brothers soon. Hmmm…maybe some sisters, too. Without the ‘stache.
Tnx for sharing the pattern! I just have the bottom and the nose left to make. Now I wounder how you make the mustashe?
Greetings from Sweden!
Hello! I am glad that you like him. I just cut a mustache out of brown fabric and glued it on. Then with brown yard I stitched over the fabric and outlined the whole thing. I love how he turned out.
Awh, these are super cute. How lovely for your nan to receive such fun little gifts from you.